System Image Backup is a Windows feature, that enables you to create a backup of your hard-drive for recovery purposes. It creates a full-disk backup including the user data and apps. Hence, in case, there’s a hard-drive failure, you can restore your PC to a previous state, very easily. You don’t need to reinstall Windows from scratch or even, setup the applications once again. Your system is reverted to the way it was before a hard-drive crash, with all the apps installed.
This is made possible all thanks to the traditional ‘Windows 7 Backup and Restore’ tool, which is prevalent in Windows 8 and 10.
In one of our previous tutorials, we explained how to do a system restore, where we listed ‘system image backup’ as an alternative recovery method. Hence, this tutorial is solely dedicated on how to create a system image in Windows 8, 8.1 and 10.
Objective 1: Access Backup and Restore
In Windows 10

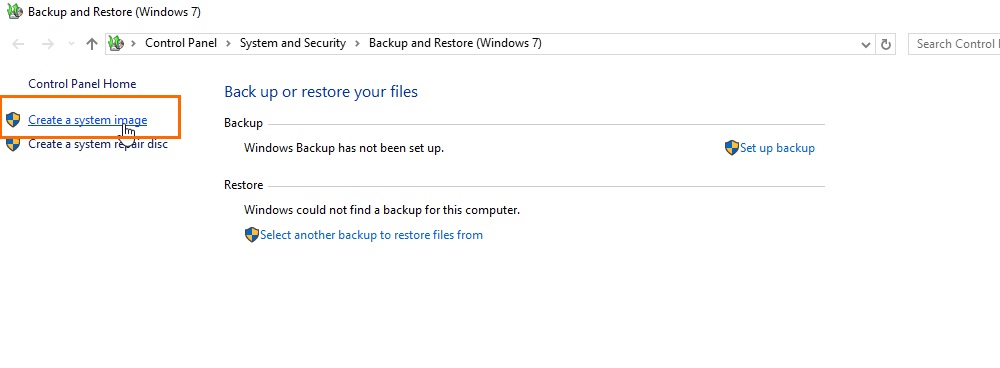
- Launch the ‘Start’ menu, and type, ‘backup’. Doing so will reveal a utility named, ‘Backup and Restore (Windows 7)’. Click on it to open the ‘Backup and Restore’ window.

- Click on ‘Create a system image’. You shall get a box asking you to specify a location for the backup. You can opt for a hard disk, bunch of DVDs or a network location. Select the one you desire.

- Hit ‘Next’. You shall now be prompted to select the partitions (apart from the primary one), you want to backup. Click Next->Start Backup to commence the process.

In Windows 8/8.1
- Access the Charms Bar, and search ‘File History’. Click on ‘File History’ which will lead you to its window.
- At the bottom left of the window, you shall see a link named, ‘System Image Backup’. Click on it to continue.
- The process to create a system image is the same as that of Windows 10. Repeat from Step-2 onwards, as mentioned earlier in this tutorial.
Objective 2: (Optional) Create A System Repair Disc
A system repair disc, not only acts as a backup source but also can also be used to boot up your system. It also gives you the privilege of fixing startup issues with the help of recovery tools like system image recovery. When the backup creation is complete, Windows will prompt you to create a system repair disc. Select your DVD or external USB drive. Click on ‘Create Disc’ to initiate the process.
Objective 3: Recover From A System Image
Boot up from the Windows installation or a recovery disc. Navigate to Troubleshoot -> Advanced to enlist all the system recovery tools. Click on ‘System Image Recovery’ to continue. Next sign-in to a user account, and subsequently commence the system image recovery by selecting a ‘system image’.
The video below explains all the steps needed to create a system image precisely. You can watch it for further reference.
https://www.youtube.com/watch?v=dzQPXdRsTwU
Advantages And Disadvantages Of System Image Backup
The advantage of using a system image backup for recovery is that it removes the need of reinstalling Windows. You can revert to exact working state your system was in before a hard-drive crash. However, you can’t use it for recovery purposes in another PC. This is because, while creating a system image, Windows attaches all the relevant details like BIOS information, digital certification, and master boot records. Hence, it’ll work for a single computer only.
Creating a system image backup is also a time-consuming procedure. It may take as long as 3 hours to a complete night, for backing up your drives. However, it solely depends on the type of hardware you have. If you happen to use SSDs for your system (source+destination), as well, as for the backup, it might take a much lesser amount of time. Drives connected over USB 2.0 have significant lower speed when compared to Internal, USB 3.0, 3.1 and Thunderbolt ones.
Was our tutorial more than enough to guide you on how to create a system image? Do you still have any queries? Then let us know in the comments section below.


