Wondering how to edit the host file on your Windows/Linux/Mac machine? The host file is an operating system file that maps domain names to IP addresses. You will not be able to modify it unless you have administrator privileges.
You should not modify the host file if an unauthorized software tool tells you to activate it for a longer period (it usually happens when you download malicious software tools or cracked software). Modifying it for the purpose may not affect your computer, but in some cases, you allow adware programs the ability to deliver you ads while you browse the web.
So, when should you try to edit the host file? To give you some idea, we have mentioned a few situations below:
- If you are a webmaster testing your site, instead of changing the DNS records from your domain’s control panel simply map the new IP address to your domain in the host file and only you will be able to access your site running on the new server.
- If you need to unblock a site
- If you want to grant special privileges to your local machine with access to certain parts of your website/server.
There might be several more uses to why we need to edit the host file. But, these are the most common situations you would probably encounter. Now that we know why and when do we need it but how do we edit the host file?
Note: The format of editing the host file is same for all platforms (Windows/Linux/Mac). Usually, the IP address comes first and then the host name. “#” sign marks a comment. So, whatever you write after the hash symbol, it would be ignored by the system. For instance, 0.0.0.0 mywebsite.com #onlinepublication (0.0.0.0 is a sample IP address not a real IP).
How To Edit The Host File On Windows?
- Press Windows key + S to activate the search option. Now, type in “Notepad.” Do not launch it now. If already launched, close it and redo the process mentioned and wait for the search results.

- Now, right-click on Notepad to find a couple of options. You need to click on “Run as administrator” as shown in the image above. If it asks you to enter the credentials, fill in the admin username/password.
- In the Notepad click on the “File” menu then click on “Open.”
- You just have to navigate your way to the host file now. You need to reach here – C:\Windows\System32\drivers\etc
- You will now find the “host” file listed. If you see no files listed then change the type of files from Text documents to “All Files” as shown in the image below. Before modifying, make sure to have a copy of the original host file.

- Simply select the host file and open it. You should see something like this now (# starts a comment line and is not executed):

- Now, modify the file as per your requirement and save it.
How To Edit The Host File On Linux?

Editing the host file on any Linux distro is easy. You just need to open the terminal. Usually, you can take the help of the GUI to search for the terminal in the applications or simply press Ctrl + Alt + T.
Now, you just have to type in a command to open and edit the host file (you have to modify it in the terminal itself):
sudo nano /etc/hosts or vim /etc/hostsIf you want to utilize the GUI, you can try:
sudo -i gedit /etc/hostsAfter modifying save the file by pressing Ctrl + X and close it.
How To Edit The Host File On Mac?
Editing the host file on Mac is same as you do on Linux. You just have to navigate your way to find the terminal. To do that, follow the images below:
- Select “Utilities” from the Applications tab.

- Now, click on it and you will find “Terminal” listed as shown in the image below.

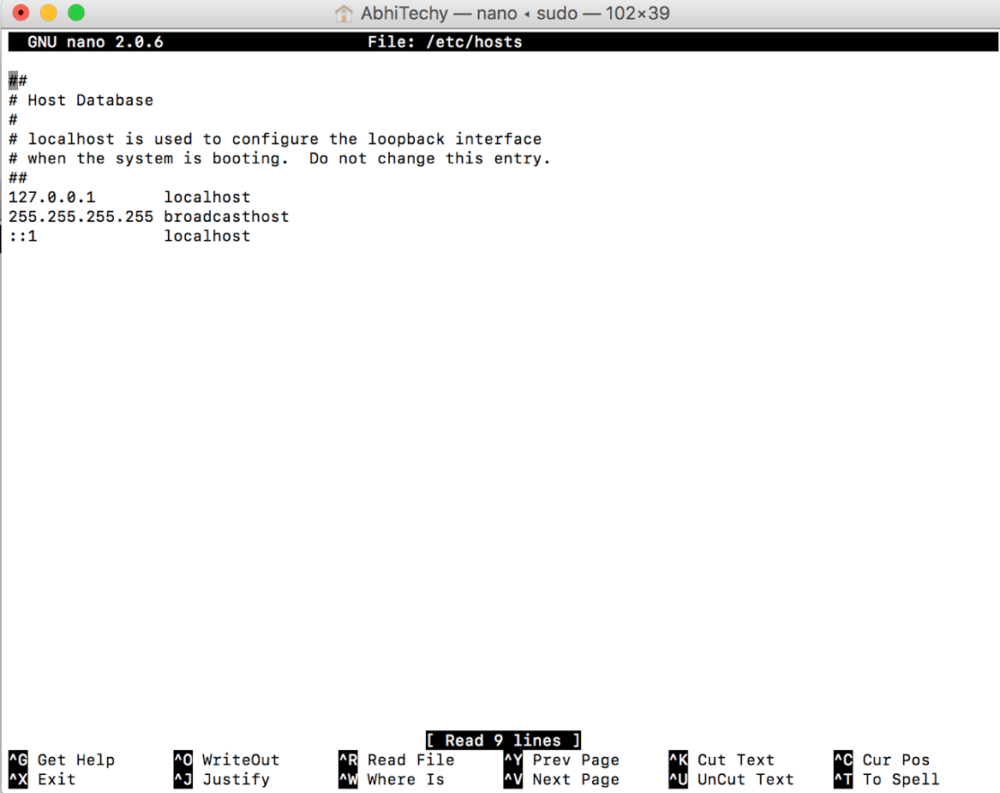
- After you launch the terminal, type in:
sudo nano /etc/hoststo open the host file. Now, adjust the cursor to modify it and then press Ctrl + O to save it.
If you want to watch a video for a better understanding, we would recommend watching this:
Wrapping Up
Now that you have known how to edit the host file on Windows, Linux, & Mac, you can do a lot more things when you dive deep on using host file for a variety of purposes. Are you encountering a problem following this article? Let us know in the comments down below.
Filed in ..


 Now, adjust the cursor to modify it and then press Ctrl + O to save it.